If you are looking to connect your Gmail or any other email account to your computer, our guide will help you to achieve that goal. This guide will cover adding email to any computer running Windows 10, 7, and below.
Adding Email to Your Windows 10 Computer
With Windows 10, the default email software that comes with the computer is called “Mail”.
1) To get started, simply click on the Mail icon on your taskbar or start menu. If you can not locate it, in the computer search, type in “Mail”.
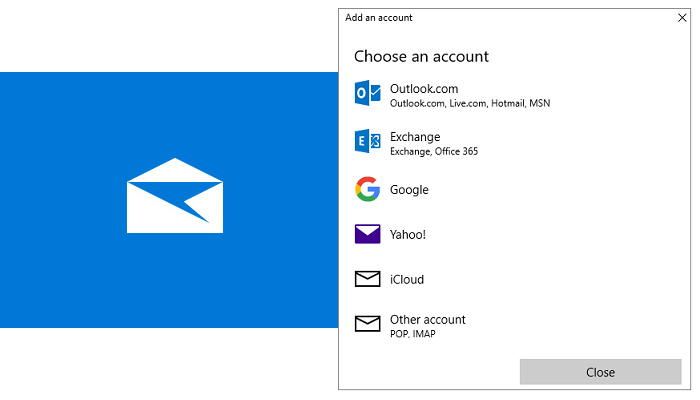
2) Once the app is open, you will be introduced to a welcome screen. Click on Add Account.
3) For users who have accessed the Mail app before, go to Settings (cogwheel icon), then click on Manage Accounts.
4) On the next screen, select the email service you have. For this instance, we will choose Google.
5) Google will then ask you to enter your email address and password to complete the setup.
6) Once you are finished, click Done. The Mail app will start to sync and download your new messages from your Gmail account.
Your Mail app is now ready to send and receive emails.
Adding a regular or domain name POP email address to Mail App.
1) Open the Mail App, on the left side navigation, click on settings (cogwheel icon), then click on Manage Accounts.
2) From here, click on Add account.
3) Click on Other account – POP, IMAP.
4) Follow the onscreen wizard by entering your POP/SMTP or IMAP/SMTP info. You can find this info in the receipt email when you purchased your domain name. This info is also located in your mail setup in your cPanel or Plesk control panel.
If you still are having problems locating this info, contact your web host or hosting provider.
Adding email to Outlook on a Windows 7 Computer
If it’s your first time setting up email in Outlook, launch the software to begin the setup wizard.
1) Select Yes to configure Outlook to connect to Internet E-mail.
2) On the Auto Account Setup page, choose “Manually configure server settings…”, then click on Next.
3) Choose “Internet E-mail”, then click on next.
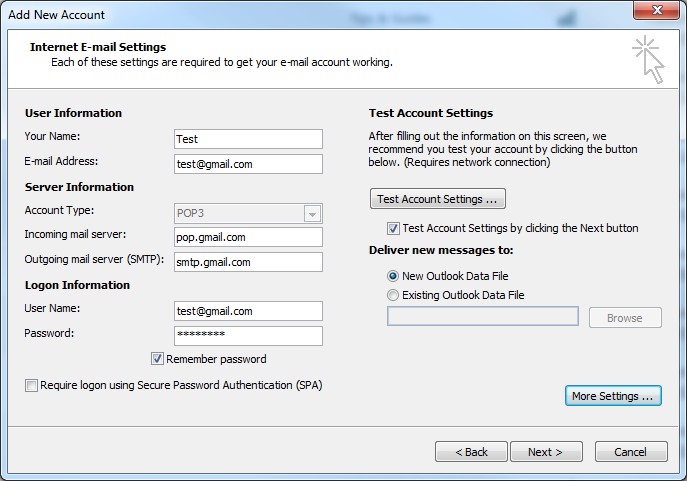
4) Fill out your account email by entering info into the following fields:
Your Name: Any Name
Email Address: Your Email Address
Account Type: POP3
Incoming Mail Server: pop.gmail.com (for other email’s, check your mail server info)
Outgoing Mail Server: smtp.gmail.com (for other email’s, check your mail server info)
Use Name: Enter your email address
Password: Enter your email password
5) Click on More Settings, then select the Outgoing Server tab. Check the box that says “My outgoing server (SMTP) requires authentication.
6) Select “Use same settings as my incoming mail server”.
7) Click on the Advanced tab and choose these settings:
Incoming server (POP3): 995
Checkbox for: This server requires an encrypted connection (SSL)
Outgoing server (SMTP): 587
Use the following type of encrypted connection: TLS
8) Hit the Ok button when finished.
9) Click the Next button and a test email will be sent and received.
You are all set! We also have a guide on how to add another email address to a gmail account to checkout. If you have any questions or problems, feel free to leave a comment below. Thanks for reading!


